Saturday 26 December 2020

Best Security Practices for Remote Access (Secure Shell) in Cisco and Juniper Devices


1.Remote access should be via SSH and telnet is disabled
IOS-XR:
no telnet ipv4 server

Nexus OS:
no feature telnet
feature ssh
feature tacacs+

JunOS:
delete system services 


2. SSH should be version 2 or higher. Do not run v1.
IOS-XR:
ssh server v2
ssh server vrf management

Nexus OS:
ssh server v2
ssh server vrf management
ssh timeout 60

JunOS:
set system services ssh protocol-version v2

3. Configure SSH logging 

IOS-XR:
ssh server logging

4. Configure Login Banner

IOS-XR:
banner login ^C

*************************************************************************
        UNAUTHORIZED ACCESS TO THIS DEVICE IS PROHIBITED

You must have explicit, authorized permission to access or configure this 
device.Unauthorized attempts and actions to access or use this system may
result in civil and/or criminal penalties. 
All activities performed on this device are logged and monitored.

*************************************************************************

^C

Nexus OS:

banner motd ^

*************************************************************************
        UNAUTHORIZED ACCESS TO THIS DEVICE IS PROHIBITED

You must have explicit, authorized permission to access or configure this 
device.Unauthorized attempts and actions to access or use this system may
result in civil and/or criminal penalties. 
All activities performed on this device are logged and monitored.

*************************************************************************


^

JunOS:

set system login message "\n*************************************************************************\n       UNAUTHORIZED ACCESS TO THIS DEVICE IS PROHIBITED\n\nYou must have explicit, authorized permission to access or configure this \ndevice.Unauthorized attempts and actions to access or use this system may \nresult in civil and/or criminal penalties.\nAll activities performed on this device are logged and monitored.\n\n*************************************************************************\n\n"

5. Configure   timestamp, login authentication (exec and session) timeout, ssh only transport input, with ACL configured to allow only authorized IPs and secret password in case tacacs/radius is down

IOS-XR:

line default
 secret 5 $1$dAr.$win1P9yOuG1CSvO6v8tAL4
 login authentication default
 timestamp
 exec-timeout 5 0
 access-class ingress SSH-ACCESS
 session-timeout 5
 transport input ssh
 

ipv4 access-list SSH-ACCESS
 10 permit tcp host 192.168.1.100 any eq ssh
 20 permit tcp host 192.168.1.101 any eq ssh
 30 deny ipv4 any any log
 

 Nexus OS:
interface mgmt0
  ip access-group SSH-ACCESS in
  vrf member management
  ip address 192.168.10.100/24

ip access-list SSH-ACCESS
  10 permit tcp 192.168.1.100/32 any eq 22
  20 permit tcp 192.168.1.101/32 any eq 22
  30 deny ip any any log

line vty
  exec-timeout 5
  access-class SSH-ACCESS in

 6. SSH inactivity timeout should be configured
IOS-XR:
ssh timeout 60

7. Enforce 2FA(2-factor authentication) and configure centralized AAA. Complex password/passphrase should be enforce in Tacacs/Radius Servers.

IOS-XR:
aaa authorization exec default group TACACS group tacacs+ none
aaa authorization commands default group TACACS group tacacs+ none
aaa authorization eventmanager default group tacacs+
aaa authentication login default group TACACS group tacacs+ local

aaa group server tacacs+ TACACS
 vrf management
 server-private 192.168.1.111 port 49
  key 7 143413081E1E0B203F3F213A

 Nexus OS:

aaa authentication login default group tacacs
aaa authentication login console group tacacs
aaa authorization config-commands default group tacacs local
aaa authorization commands default group tacacs local
aaa accounting default group tacacs

tacacs+ distribute
ip tacacs source-interface mgmt0
tacacs-server host 192.168.1.111 key 7 "enc_ryptedkey"
tacacs+ commit

JunOS:

set system authentication-order tacplus
set system tacplus-server 192.168.1.111 routing-instance mgmt_junos
set system tacplus-server 192.168.1.111 secret "$9$Gq.5WLGi.56/veLHvYJZjkmTGDLN4oWLXV"
set system tacplus-server 192.168.1.111 timeout 30
set system tacplus-server 192.168.1.111 single-connection
set system tacplus-server 192.168.1.111 source-address 192.168.1.2

set system accounting destination tacplus server 192.168.1.111 secret "$9$-4dHm8XUGiqPQT/9M8Xxb2Z2aZGi.mT"
set system accounting destination tacplus server 192.168.1.111 single-connection
set system accounting destination tacplus server 192.168.1.111 source-address192.168.1.2

For more info, pls. refer to this --> https://mynetworkbio.blogspot.com/2019/08/tacacs-aaa-configuration-in-juniper-and.html

8. Configure control-plane management for SSH if possible

IOS-XR:

control-plane
 management-plane
  out-of-band
   interface MgmtEth0/RP0/CPU0/0
    allow SSH peer
     address ipv4 192.168.1.100
     address ipv4 192.168.1.101


JunOS:

set firewall family inet filter IPv4-PROTECT-RE term SSH from source-prefix-list ALLOWED-IP
set firewall family inet filter IPv4-PROTECT-RE term SSH from protocol tcp
set firewall family inet filter IPv4-PROTECT-RE term SSH from port ssh
set firewall family inet filter IPv4-PROTECT-RE term SSH then count SSH
set firewall family inet filter IPv4-PROTECT-RE term SSH then accept

set policy-options prefix-list ALLOWED-IP 192.168.1.100/32
set policy-options prefix-list ALLOWED-IP 192.168.1.101/32
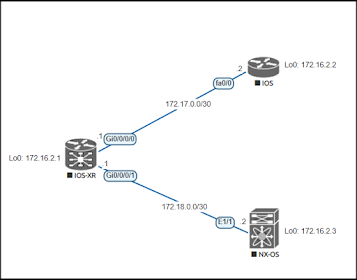
Sample IS-IS Configuration in Cisco IOS-XR, IOS and Nexus OS


Fig.1


IOS-XR

Configure Loopback

 interface Loopback0
 ipv4 address 172.16.2.1 255.255.255.255
 ipv6 address fdfe:abcd:ef12:0:172:16:2:1/128
 ipv6 enable
 

Configure P2P IP 

interface Gi0/0/0/0
 description Connection to IOS Fa0/0
 ipv4 address 172.17.0.1 255.255.255.252
 ipv4 verify unicast source reachable-via any
 ipv4 unreachables disable
 ipv6 nd suppress-ra
 ipv6 verify unicast source reachable-via any
 ipv6 address fdfe:ab12:cd34:a00:1::/127
 ipv6 enable
 ipv6 unreachables disable
 load-interval 30
 dampening

interface Gi0/0/0/1
 description Connection to NX-OS E1/1
 ipv4 address 172.18.0.1 255.255.255.252
 ipv4 verify unicast source reachable-via any
 ipv4 unreachables disable
 ipv6 nd suppress-ra
 ipv6 verify unicast source reachable-via any
 ipv6 address fdfe:ab12:cd34:a00:2::/127
 ipv6 enable
 ipv6 unreachables disable
 load-interval 30
 dampening


Configure IS-IS

router isis ABC
 is-type level-2-only
 net 49.0000.1720.1600.2001.00
 nsf ietf
 log adjacency changes
 address-family ipv4 unicast
  metric-style wide
  maximum-paths 8
 address-family ipv6 unicast
  metric-style wide
  maximum-paths 8
 

 interface Loopback0
  passive
  address-family ipv4 unicast
  address-family ipv6 unicast
 

 interface Gi0/0/0/0
  point-to-point
  address-family ipv4 unicast
  address-family ipv6 unicast

 interface Gi0/0/0/1
  point-to-point
  address-family ipv4 unicast
  address-family ipv6 unicast

IOS

Configure Loopback

interface Loopback0
 ip address 172.16.2.2 255.255.255.255
 no ip redirects
 no ip unreachables
 no ip proxy-arp
 ipv6 address fdfe:abcd:ef12:0:172:16:2:2/128
 ipv6 enable
 no ipv6 redirects

 Configure P2P IP

interface Fa0/0
 description Connection to IOS-XR Gi0/0/0/0
 dampening
 ip address 172.17.0.2 255.255.255.252
 no ip redirects
 no ip unreachables
 no ip proxy-arp
 ip router isis ABC
 load-interval 30
 ipv6 address fdfe:ab12:cd34:a00:1::1/127
 ipv6 enable
 ipv6 nd ra suppress
 no ipv6 redirects
 ipv6 router isis ABC

 Configure IS-IS

router isis ABC
 net 49.0000.1720.1600.2002.00
 metric-style wide
 set-overload-bit on-startup 20
 log-adjacency-changes
 nsf ietf
 passive-interface default
 no passive-interface Fa0/0

address-family ipv6
  multi-topology
 exit-address-family


NX-OS

Configure P2P IP

interface Eth1/1
  description Connection to IOS-XR Gi0/0/0/1
  no cdp enable
  no ip redirects
  ip address 172.18.0.2/30
  ip verify unicast source reachable-via any rx
  ipv6 address fdfe:ab12:cd34:a00:2::1/127
  ipv6 verify unicast source reachable-via rx
  no ipv6 redirects
  ip router isis ABC
  ipv6 router isis ABC
  isis network point-to-point
  no isis passive-interface level-2
  no shutdown

router isis ABC
  net 49.0000.1720.1600.2003.00
  is-type level-2
  metric-style transition
  set-overload-bit on-startup 20
  log-adjacency-changes
  address-family ipv4 unicast
  address-family ipv6 unicast
    multi-topology transition
  passive-interface default level-2

VERIFICATION

IOS-XR:

RP/0/RP0/CPU0:IOS-XR#show isis adjacency | i IOS
Wed Dec 23 14:22:14.273 SST
IOS           Gi0/0/0/0       *PtoP*        Up    27   1y07w    Yes Up   Up
NX-OS     Gi0/0/0/1       *PtoP*        Up    27   1y06w    Yes Up   Up

IOS:
IOS#show isis neighbors

Tag ABC:
System Id       Type Interface     IP Address      State Holdtime Circuit Id
IOS-XR        L2   Te0/3/0         172.17.0.2          UP    28       00


NX-OS:

NX-OS# show isis adjacency
IS-IS process: ABC VRF: default
IS-IS adjacency database:
Legend: '!': No AF level connectivity in given topology
System ID       SNPA            Level  State  Hold Time  Interface
IOS-XR        N/A             2      UP     00:00:22   Ethernet1/1

Wednesday 16 December 2020

Troubleshooting (Debugging) BGP in Juniper using Traceoptions


"traceoptions" statement in Juniper let you debug BGP protocol issues. If cannot connect BGP peering, you can set the "traceoptions" to understand further about the issue.


1. Configure "traceoptions" and name the log as debug-bgp

set protocols bgp group BGP-GROUP1 traceoptions file debug-bgp
set protocols bgp group BGP-GROUP1traceoptions file size 1m
set protocols bgp group BGP-GROUP1 traceoptions file files 2
set protocols bgp group BGP-GROUP1 traceoptions flag all

commit

where:
max trace file size = 1m
max trace files = 2
flag all = trace everything


It will look something like this:

user1@QFX-re0> show configuration protocols bgp group BGP-GROUP1

type external;
traceoptions {
    file debug-bgp size 1m files 2;
    flag all;

2. View the trace file to verify

user1@QFX-re0> file list /var/log/debug-bgp
/var/log/debug-bgp


3. View the contents

user1@QFX-re0> file show /var/log/debug-bgp
Dec 16 13:37:36 trace_on: Tracing to "/var/log/debug-bgp" started

4. Monitor the log 
user1@QFX-re0> monitor start debug-bgp

[SAMPLE OUTPUT]
Dec 16 14:02:13.411153 bgp_connect_start: peer 192.168.10.200 (External AS 65510)
Dec 16 14:02:13.411158 bgp_event: peer 192.168.10.200 (External AS 65510) old state Active event ConnectRetry new state Connect
Dec 16 14:02:13.411355 task_get_socket: domain AF_INET  type SOCK_STREAM  protocol 0  socket 99
Dec 16 14:02:13.411370 task_set_option_internal: task BGP_65510_65520.192.168.10.200 socket 99 option RecvBuffer(0) value 16384
Dec 16 14:02:13.411378 task_set_option_internal: task BGP_65510_65520.192.168.10.200 socket 99 option SendBuffer(1) value 16384
Dec 16 14:02:13.411381 task_set_socket: task BGP_65510_65520.192.168.10.200 socket 99
Dec 16 14:02:13.411396 task_set_option_internal: task BGP_65510_65520.192.168.10.200 socket 99 option NonBlocking(8) value 1
Dec 16 14:02:13.411404 task_set_option_internal: task BGP_65510_65520.192.168.10.200 socket 99 option ReUsePort(38) value 1
Dec 16 14:02:13.411474 task_set_option_internal: task BGP_65510_65520.192.168.10.200 socket 99 option PathMTUDiscovery(26) value 0
Dec 16 14:02:13.411484 task_set_option_internal: task BGP_65510_65520.192.168.10.200 socket 99 option TOS(16) value 192
Dec 16 14:02:13.411493 task_set_option_internal: task BGP_65510_65520.192.168.10.200 socket 99 option DontRoute(5) value 1
Dec 16 14:02:13.411499 task_set_option_internal: task BGP_65510_65520.192.168.10.200 socket 99 option IifRestrict(36) value 1
Dec 16 14:02:13.411506 task_set_option_internal: task BGP_65510_65520.192.168.10.200 socket 99 option TTL(15) value 1
Dec 16 14:02:13.411518 Eval BFD turn-on, currently off for peer 192.168.10.200 (External AS 65510)(fl:)instance master (kern-id 0)
Dec 16 14:02:13.411595 task_set_option_internal: task BGP_65510_65520.192.168.10.200 socket 99 option TcpAggressiveTransmission(59) value 0
Dec 16 14:02:13.411608 task_set_option_internal: task BGP_65510_65520.192.168.10.200 socket 99 option EnableTcpNoDelay(63) value 0
Dec 16 14:02:13.411691 task_timer_reset: reset BGP_65510_65520.192.168.10.200_Connect
Dec 16 14:02:13.411698 task_timer_set_oneshot_latest: timer BGP_65510_65520.192.168.10.200_Connect interval set to 2:28


5. Stop monitoring using this command
user1@QFX-re0> monitor stop

6. Deactivate traceoptions if finished
user1@QFX-re0> deactivate protocols bgp group BGP-GROUP1 traceoptions

user1@QFX-re0> show configuration protocols bgp group BGP-GROUP1
type external;
inactive: traceoptions {
    file debug-bgp size 1m files 2;
    flag all;

Friday 11 December 2020

IPv4 and IPv6 Static Route Configuration in Juniper


Configuration:

IPv4:

Route the block (1.1.1.0/24) to next hop  2.2.2.1 with metric 255

user@MX-re0>configure
#set routing-options static route 1.1.1.0/24 next-hop 2.2.2.1
#set routing-options static route 1.1.1.0/24 metric 255

Optional: Set comment using annotate command

#edit routing-options static
#annotate route  1.1.1.0/24  "/* STATIC ROUTE IPv4*/"

Commit
#commit

It will look something like this:

user@MX-re0>> show configuration routing-options static
/* STATIC ROUTE IPv4*/
route 1.1.1.0/24  {
    next-hop 2.2.2.1;
    metric 255;

IPv6:

Route the block (2000:2000:2000::/56 ) to next hop 2006:3006:1:234:5:6:78:90ab with metric 255

user@MX-re0>configure
#set routing-options rib inet6.0 static route 2000:2000:2000::/56 next-hop 2006:3006:1:234:5:6:78:90ab
#set routing-options rib inet6.0 static route 2000:2000:2000::/56  metric 255

Optional: Set comment using annotate command

#edit routing-options  rib inet6.0 static 
#annotate route  2000:2000:2000::/56 "/* STATIC ROUTE IPv6*/"


It will look something like this:

user@MX-re0> show configuration routing-options rib inet6.0

    /*  STATIC ROUTE IPv6 */
    route 2000:2000:2000::/56 {
        next-hop 2006:3006:1:234:5:6:78:90ab;
        metric 255;


Verification:

user@MX-re0> show route table inet.0 | match static
1.1.1.0/24     *[Static/5] 03:05:57, metric 255

user@MX-re0> show route table inet6.0 | match static
2000:2000:2000::/56*[Static/5] 00:59:37, metric 255


Thursday 1 October 2020

Resetting ASR9000 Network Processor(NP)

 NP or network processor is the component on ASR9000 line cards that handle the feature processing of packets as they go through the system.

Sample LC: ASR9K MOD160


RP/0/RSP0/CPU0:ASR9000#  show controller np ports all location 0/1/cpu0

 Node: 0/0/CPU0:

----------------------------------------------------------------

NP Bridge Fia                       Ports                     

-- ------ --- ---------------------------------------------------

0  --     0   TenGigE0/0/0/0 - TenGigE0/0/0/1, TenGigE0/0/0/4 - TenGigE0/0/0/5
NP1 is down.
2  --     2   TenGigE0/0/1/0 - TenGigE0/0/1/1, TenGigE0/0/1/4 - TenGigE0/0/1/5
3  --     3   TenGigE0/0/1/2 - TenGigE0/0/1/3, TenGigE0/0/1/6 - TenGigE0/0/1/7
 

To reset NP1:

run attach 0/0/cpu0
show_np -e 1 -d fast_reset

Tuesday 4 August 2020

100G world


100G transceivers have been around for few years already and it is getting affordable since 2016 I guess, and it is now practical to shift to 100G instead of burning N x 10GEs.  To see more info about 100G transmission principles, I find this link very informative -> https://community.fs.com/blog/understand-100g-transceivers-transmission-principles.html

Here are sample 100G transceivers we deployed in our datacenters, it really depends on what type of vendor or hardware you have, but the most popular now is the QSFPs

Juniper 
QSFP-100GBASE-LR4 (blue) -->  100GBASE Ethernet throughput up to 10km over single mode fiber (SMF) using a wavelength of 1310nm via duplex LC connector 

QSFP-100G-SR4 (gold) --> 100GBASE Ethernet throughput up to 100m over OM4 multimode fiber (MMF) using a wavelength of 850nm via a MTP/MPO-12 connector


Cisco
CPAK-100G-LR4 -->  support 100Gbps optical links over standard Single-Mode Fiber (SMF) with SC or LC connectors


Tuesday 7 July 2020

SNMPv2c and SNMPv3 Polling and Traps Configuration in Cisco (IOS-XR)


SNMPv2c
community: snmpcomm123
management IP address: 192.168.10.100
SNMP Polling Server: 192.168.20.199
SNMP Trap Server: 192.168.20.200

SNMPv2c Polling Configuration:

ipv4 access-list SNMP-ALLOW
 10 permit ipv4 host 192.168.20.199 any

snmp-server contact DC-ADMIN
snmp-server location Datacentre
snmp-server trap-source Loopback0
snmp-server community snmpcomm123 RO SystemOwner IPv4 SNMP-ALLOW


SNMPv2c Traps Configuration:
configure
snmp-server traps
snmp-server host 192.168.20.200 traps snmpcomm123  

Verify:

/usr/bin/snmpwalk -M /usr/local/snmp/mibs -v2c -c snmpcomm123 192.168.10.100:161 sysDescr.0 
SNMPv2-MIB::sysDescr.0 = STRING: Cisco IOS XR Software (Cisco ASR9K Series),  Version 6.2.3[Default]
Copyright (c) 2018 by Cisco Systems, Inc.


SNMPv3
user: snmpuser
Security Level: Authpriv with SHA authentication and AES 128bit Privacy
management IP address: 192.168.10.100
AuthPass: authpass123!
PrivPass: privpass123!
View Name: ALLVIEW
Username:
Group Name: SNMPGROUP
SNMP Polling Server: 192.168.20.199
SNMP Trap Server: 192.168.20.200

SNMPv3 Polling Configuration:

ipv4 access-list SNMP-ALLOW
 10 permit ipv4 host 192.168.20.199 any

snmp-server view ALLVIEW 1.3 included
snmp-server group SNMPGROUP  v3 priv notify ALLVIEW read ALLVIEW IPv4 SNMP-ALLOW
snmp-server user SNMPUSER SNMPGROUP v3 auth sha authpass123! priv aes 128 privpass123! IPv4 SNMP-ALLOW

SNMPv3 Traps Configuration:
snmp-server host 192.168.20.200 traps version 3 priv SNMPUSER


Additional Tip: (Manual trigger of SNMP traps)
#snmp test trap interface link-down
#snmp test trap interface link-up


Here's the Juniper version for SNMPv2c and SNMPv3 configuration --> SNMP Configuration in Juniper

Thursday 2 July 2020

Control Plane Policing (CoPP) Configuration in Cisco IOS

As per Cisco website definition:
Control Plane Policing (CoPP) is a Cisco IOS-wide feature designed to allow users to manage the flow of traffic handled by the route processor of their network devices. CoPP is designed to prevent unnecessary traffic from overwhelming the route processor that, if left unabated, could affect system performance.

Here's a sample configuration in applying CoPP.


Step1: Create necessary ACLs 
a. Important services,e.g.NTP,SSH,SNMP

ip access-list extended SSH-ACL
 permit tcp host 192.168.10.10 any eq 22
 permit tcp host 192.168.20.20 any eq 22
 deny   tcp any any eq 22

ip access-list standard SNMP-ACL
 permit 192.168.30.30
 permit 192.168.40.40

ip access-list standard NTP-ACL
 permit 172.16.18.2
 permit 172.16.18.3

b.ICMP
ip access-list extended ICMP-ACL
  permit icmp any any echo
  permit icmp any any echo-reply
  permit icmp any any ttl-exceeded
  permit icmp any any port-unreachable

c. IGP
ip access-list extended IGP-ACL
  permit ospf any any
  permit tcp 192.168.3.0 0.0.0.255 192.168.3.0 0.0.0.255 eq bgp
  permit tcp 192.168.3.0 0.0.0.255 eq bgp 192.168.3.0 0.0.0.255

d. Those harmful services or traffic
ip access-list extended HARMFUL-ACL
 permit tcp any any fragments
 permit udp any any fragments
 permit icmp any any fragments
 permit ip any any fragments
 permit udp any any range netbios-ns netbios-ss
 permit tcp any any eq 445
 permit udp any any eq 445
 permit udp any any eq 1434
 permit tcp any any range 137 139

e. All traffic
ip access-list extended ALL-ACL
 permit pim any any
 permit igmp any any
 permit icmp any any
 permit gre any any
 permit tcp any any
 permit udp any any
 permit ip any any


Step2: Configure Class Map
class-map match-any CoPP-SSH-SNMP-NTP
 match access-group name SSH-ACL
 match access-group name SNMP-ACL
 match access-group name NTP-ACL

class-map match-all CoPP-ICMP
 match access-group name ICMP-ACL

class-map match-all CoPP-IGP
 match access-group name IGP-ACL

class-map match-all CoPP-HARMFUL
 match access-group name HARMFUL-ACL

class-map match-all CoPP-ALL
 match access-group name ALL-ACL


Step3:Configure Policy Map (conform and exceed-action can be transmit or drop)
 police  [Target Bit Rate] [burst bytes] [burst bytes] [burst bytes] [conform-action] [transmit/drop]  [exceed-action] [transmit/drop]
 police  [cir]  [Target Bit Rate]  [conform burst] [burst bytes] [excess burst] [burst bytes] [conform-action] [transmit/drop]  [exceed-action] [transmit/drop]

Assumption: 5% excess burst

policy-map CoPP
  class CoPP-SSH-SNMP-NTP
  police 200000 10000 10000 conform-action transmit  exceed-action transmit
class CoPP-ICMP
  police 200000 10000 10000  conform-action transmit  exceed-action transmit
 class CoPP-IGP
  police 500000 25000 25000 conform-action transmit  exceed-action transmit
 class CoPP-HARMFUL
  police cir 40000 bc 2000 be 2000 conform-action transmit  exceed-action drop
 class CoPP-ALL
  police 300000 15000 15000 conform-action transmit  exceed-action transmit


For CoPP Best Practices,you can refer to this Cisco CoPP Best Practices

Tuesday 30 June 2020

Configuring NetFlow in Cisco (IOS-XR and Nexus OS) and Juniper (JunOS)


Cisco IOS-XR:
The NetFlow use these 3 maps to configure

Step1. EXPORTER MAP - configure parameters like export destination IP, udp port (only supported transport protocol), source interface

IPv4:
flow exporter-map NETFLOW-EXPORTER-MAP
 version v9

  transport udp 9991
  source Loopback0
  destination 192.168.30.100

IPv6:
flow exporter-map IPv6-NETFLOW-EXPORTER-MAP
 version v9

  transport udp 9991
  source Loopback0
  destination 192.168.30.100


Note: destination  udp port can be from  <1024-65535> (this is where Netflow is listening)


Step2. MONITOR MAP includes flow record map and flow exporter map. Some of the attriubtes that can be configured like number of cache entries and timeout. Record that supports are ipv4, ipv6 and mpls.

IPv4:
flow monitor-map NETFLOW-MONITOR-MAP
 record ipv4
 exporter NETFLOW-EXPORTER-MAP
 cache timeout active 10
 cache entries 1000

IPv6:
flow monitor-map IPv6-NETFLOW-MONITOR-MAP
 record ipv6
 exporter IPv6-NETFLOW-EXPORTER-MAP
 cache timeout active 10
 cache entries 1000


3.SAMPLER MAP - configure the packet rate (one out of n packets) to sample

sampler-map NETFLOW-SAMPLER-MAP
 random 1 out-of 100

sampler-map IPv6-NETFLOW-SAMPLER-MAP
 random 1 out-of 100

Note: Sampling interval to use random mode for sampling packets of 1 through 65535 units

Application:
Apply in interface (can be applied in L3 bundle or physical interface, on single or both direction)
configure
  interface Te0/0/0/0
   flow ipv4 monitor NETFLOW-MONITOR-MAP sampler NETFLOW-SAMPLER-MAP ingress
   flow ipv6 monitor IPv6-NETFLOW-MONITOR-MAP sampler NETFLOW-SAMPLER-MAP ingress


Cisco Nexus:

[Pre-config] Enable netflow 
configure 
 feature netflow

Step1. Configure EXPORTER MAP

flow exporter ExporterMap
  description Exporter Map to Netflow Server
  destination 192.168.30.100 use-vrf management
  transport udp 9991
  source mgmt0
  version 9
    option exporter-stats timeout 120
    option sampler-table timeout 120

Step2. Configure MONITOR MAP

flow monitor MonitorMap
  record netflow-original
  exporter ExporterMap

where:netflow-original  is the traditional IPv4 input NetFlow with origin ASs
 or can use a customized flow record

e.g.
flow record CustomRecord
  match ipv4 source address
  match ipv4 destination address
  match ip protocol
  match ip tos
  match transport source-port
  match transport destination-port
  collect transport tcp flags
  collect counter bytes
  collect counter packets

flow monitor MonitorMap
  record CustomRecord
  exporter ExporterMap


Step3. Configure SAMPLER MAP
sampler SamplerMap
  mode 1 out-of 100

Application:
configure
 interface Eth1/1
 ip flow monitor MonitorMap input sampler SamplerMap


Juniper (JunOS):

Step1. Configure EXPORTER MAP
set services flow-monitoring version9 template NETFLOW_MONITOR template-refresh-rate seconds 15
set services flow-monitoring version9 template NETFLOW_MONITOR option-refresh-rate seconds 15
set services flow-monitoring version9 template NETFLOW_MONITOR ipv4-template

Step2. Configure MONITOR MAP

set forwarding-options sampling instance NETFLOW_INSTANCE family inet output flow-server 192.168.30.100 port 9991
set forwarding-options sampling instance NETFLOW_INSTANCE family inet output flow-server 192.168.30.100 source-address 192.168.1.100
set forwarding-options sampling instance NETFLOW_INSTANCE family inet output flow-server 192.168.30.100 version9 template NETFLOW_MONITOR
set forwarding-options sampling instance NETFLOW_INSTANCE family inet output inline-jflow source-address 192.168.1.100

Step3. Configure SAMPLER MAP
set forwarding-options sampling instance NETFLOW_INSTANCE input rate 100
set forwarding-options sampling instance NETFLOW_INSTANCE input run-length 0


Application:
set interfaces ge-0/0/0 unit 0 family inet sampling input

Wednesday 24 June 2020

Configuring Banner or Login Message in Cisco and Juniper


Taking Cisco's  Sample Legal Banner message from their Network Security Baseline page.
Sample Legal Banner Notification Configuration
! Present a legal notification banner approved by company legal counsel
banner login #
UNAUTHORIZED ACCESS TO THIS DEVICE IS PROHIBITED
You must have explicit, authorized permission to access or configure this device.
Unauthorized attempts and actions to access or use this system may result in civil and/or 
criminal penalties.
All activities performed on this device are logged and monitored.
#
!

Here's how to configure for:
Cisco

RP/0/0/CPU0:R3#configure 
Wed Jun 24 05:33:02.134 UTC
RP/0/0/CPU0:R3(config)#banner login #
Enter TEXT message. End with the character '#'
*************************************************************************
        UNAUTHORIZED ACCESS TO THIS DEVICE IS PROHIBITED

You must have explicit, authorized permission to access or configure this 
device.Unauthorized attempts and actions to access or use this system may
result in civil and/or criminal penalties. 
All activities performed on this device are logged and monitored.

*************************************************************************
#
RP/0/0/CPU0:R3#commit
Sample Output:


Juniper

darwin@vMX-1>configure
darwin@vMX-1#set system login message "\n*************************************************************************\n       UNAUTHORIZED ACCESS TO THIS DEVICE IS PROHIBITED\n\nYou must have explicit, authorized permission to access or configure this \ndevice.Unauthorized attempts and actions to access or use this system may \nresult in civil and/or criminal penalties.\nAll activities performed on this device are logged and monitored.\n\n*************************************************************************\n\n"

darwin@vMX-1#commit

As per Juniper website, message can be formatted using these following characters:

\n—New line
\t—Horizontal tab
\'—Single quotation mark
\"—Double quotation mark
\\—Backslash

Sample output:


Thursday 18 June 2020

Sample Juniper Firewall Configuration to Protect Routing Engines


Here's sample firewall configuration in protecting the box and its services.

ICMP:
ICMP message types are essential for network administration and troubleshooting. There are quite a number of ICMP parameters, you can refer to IANA ICMP Parameters for the list or if you want to learn more details about ICMP can refer to RFC792.
Here's the 4 types I consider useful for troubleshooting and need to be allowed.


Type 0 — Echo Reply --> response from target to host
Type 8 — Echo Request--> host to target
Type 11 — Time Exceeded --> returned to host when doing traceroute
Type 3 — Destination Unreachable --> for MTU path discovery

Pre-config (create a policer)
set firewall policer limit-128k if-exceeding bandwidth-limit 128k
set firewall policer limit-128k if-exceeding burst-size-limit 15k
set firewall policer limit-128k then discard

Juniper Configuration:
set firewall family inet filter FIREWALL-RE term ICMP_PING from protocol icmp
set firewall family inet filter FIREWALL-RE term ICMP_PING from icmp-type echo-request
set firewall family inet filter FIREWALL-RE term ICMP_PING from icmp-type echo-reply
set firewall family inet filter FIREWALL-RE term ICMP_PING then policer limit-128k
set firewall family inet filter FIREWALL-RE term ICMP_PING then count ICMP
set firewall family inet filter FIREWALL-RE term ICMP_PING then accept

set firewall family inet filter FIREWALL-RE term ICMP_TTL from protocol icmp
set firewall family inet filter FIREWALL-RE term ICMP_TTL from icmp-type time-exceeded
set firewall family inet filter FIREWALL-RE term ICMP_TTL from icmp-type unreachable
set firewall family inet filter FIREWALL-RE term ICMP_TTL then policer limit-128k
set firewall family inet filter FIREWALL-RE term ICMP_TTL then accept

SSH:
It is recommended to use SSH for remote access for better security. Telnet is strictly discourage because of unencrypted communication for potential network sniffing.

Juniper Configuration:
set firewall family inet filter FIREWALL-RE term REMOTE_ACCESS from source-prefix-list SSH-PREFIX-LIST
set firewall family inet filter FIREWALL-RE term REMOTE_ACCESS from protocol tcp
set firewall family inet filter FIREWALL-RE term REMOTE_ACCESS from port ssh
set firewall family inet filter FIREWALL-RE term REMOTE_ACCESS then count REMOTE_ACCESS
set firewall family inet filter FIREWALL-RE term REMOTE_ACCESS then accept

set policy-options prefix-list SSH-PREFIX-LIST 192.168.10.101/32
set policy-options prefix-list SSH-PREFIX-LIST 192.168.10.102/32

where: 192.168.10.101 & 102 are the authorized IPs that are allowed to SSH into the device.


AAA(Tacacs):
Juniper Configuration:
set firewall family inet filter FIREWALL-RE term AAA_ALLOW from source-prefix-list TACACS-PREFIX-LIST
set firewall family inet filter FIREWALL-RE term AAA_ALLOW from protocol tcp
set firewall family inet filter FIREWALL-RE term AAA_ALLOW from source-port tacacs
set firewall family inet filter FIREWALL-RE term AAA_ALLOW then count AAA
set firewall family inet filter FIREWALL-RE term AAA_ALLOW then accept

set policy-options prefix-list TACACS-PREFIX-LIST  192.168.10.200/32

where: 192.168.10.200 is Tacacs Server


SNMP:
Juniper Configuration:
set firewall family inet filter FIREWALL-RE term SNMP_ALLOW from source-prefix-list SNMP-PREFIX-LIST
set firewall family inet filter FIREWALL-RE term SNMP_ALLOW from protocol udp
set firewall family inet filter FIREWALL-RE term SNMP_ALLOW from destination-port snmp
set firewall family inet filter FIREWALL-RE term SNMP_ALLOW then count SNMP
set firewall family inet filter FIREWALL-RE term SNMP_ALLOW then accept

set policy-options prefix-list SNMP-PREFIX-LIST  192.168.20.200/32

where: 192.168.20.200 is SNMP Polling Server


NTP:
Juniper Configuration:
set firewall family inet filter FIREWALL-RE term NTP_ALLOW from source-prefix-list NTP-PREFIX-LIST
set firewall family inet filter FIREWALL-RE term NTP_ALLOW from protocol udp
set firewall family inet filter FIREWALL-RE term NTP_ALLOW from port ntp
set firewall family inet filter FIREWALL-RE term NTP_ALLOW then policer limit-128k
set firewall family inet filter FIREWALL-RE term NTP_ALLOW then count NTP
set firewall family inet filter FIREWALL-RE term NTP_ALLOW then accept

set policy-options prefix-list NTP-PREFIX-LIST  192.168.30.200/32

where: 192.168.30.200 is NTP Server


IP Protocols
OSPF
set firewall family inet filter FIREWALL-RE term OSPF_ALLOW from protocol ospf
set firewall family inet filter FIREWALL-RE term OSPF_ALLOW then count OSPF
set firewall family inet filter FIREWALL-RE term OSPF_ALLOW then accept

LDP
set firewall family inet filter FIREWALL-RE term LDP_ALLOW from protocol tcp
set firewall family inet filter FIREWALL-RE term LDP_ALLOW from protocol udp
set firewall family inet filter FIREWALL-RE term LDP_ALLOW from port 646
set firewall family inet filter FIREWALL-RE term LDP_ALLOW then count LDP
set firewall family inet filter FIREWALL-RE term LDP_ALLOW then accept

RSVP
set firewall family inet filter FIREWALL-RE term RSVP_ALLOW from protocol rsvp
set firewall family inet filter FIREWALL-RE term RSVP_ALLOW then count RSVP
set firewall family inet filter FIREWALL-RE term RSVP_ALLOW then accept

PIM
set firewall family inet filter FIREWALL-RE term PIM_ALLOW from protocol pim
set firewall family inet filter FIREWALL-RE term PIM_ALLOW then count PIM
set firewall family inet filter FIREWALL-RE term PIM_ALLOW then accept

IGMP
set firewall family inet filter FIREWALL-RE term IGMP_ALLOW from protocol igmp
set firewall family inet filter FIREWALL-RE term IGMP_ALLOW then count IGMP
set firewall family inet filter FIREWALL-RE term IGMP_ALLOW then accept

MSDP
set firewall family inet filter FIREWALL-RE term MSDP_ALLOW from protocol tcp
set firewall family inet filter FIREWALL-RE term MSDP_ALLOW from protocol udp
set firewall family inet filter FIREWALL-RE term MSDP_ALLOW from port msdp
set firewall family inet filter FIREWALL-RE term MSDP_ALLOW then count MSDP

BGP
set firewall family inet filter FIREWALL-RE term BGP_ALLOW from source-prefix-list BGP-PREFIX-LIST
set firewall family inet filter FIREWALL-RE term BGP_ALLOW from protocol tcp
set firewall family inet filter FIREWALL-RE term BGP_ALLOW from port bgp
set firewall family inet filter FIREWALL-RE term BGP_ALLOW then count BGP
set firewall family inet filter FIREWALL-RE term BGP_ALLOW then accept

set policy-options prefix-list BGP-PREFIX-LIST  192.168.40.0/24

Others
BFD
set firewall family inet filter FIREWALL-RE term BFD_ALLOW from protocol udp
set firewall family inet filter FIREWALL-RE term BFD_ALLOW from source-port 49152-65535
set firewall family inet filter FIREWALL-RE term BFD_ALLOW from destination-port 3784
set firewall family inet filter FIREWALL-RE term BFD_ALLOW then count BFD
set firewall family inet filter FIREWALL-RE term BFD_ALLOW then accept

Traceroute
set firewall family inet filter FIREWALL-RE term TRACEROUTE from protocol udp
set firewall family inet filter FIREWALL-RE term TRACEROUTE from destination-port 33434-33678
set firewall family inet filter FIREWALL-RE term TRACEROUTE then policer limit-128k
set firewall family inet filter FIREWALL-RE term TRACEROUTE then count TRACEROUTE
set firewall family inet filter FIREWALL-RE term TRACEROUTE then accept

FINALLY.... need to put this "discard" statement at the end.

set firewall family inet filter FIREWALL-RE term REJECT_ALL then count REJECT_ALL
set firewall family inet filter FIREWALL-RE term REJECT_ALL then discard


Apply:
set interfaces lo0 unit 0 family inet filter input FIREWALL-RE


How does it looks like?

Policer:
lab@vMX-1> show configuration firewall policer limit-128k 
if-exceeding {
    bandwidth-limit 128k;
    burst-size-limit 15k;
}
then discard;

Firewall:
lab@vMX-1> show configuration firewall 
family inet {
    filter FIREWALL-RE {
        term ICMP_PING {
            from {
                protocol icmp;
                icmp-type [ echo-request echo-reply ];
            }
            then {
                policer limit-128k;
                count ICMP;
                accept;
            }
        }
        term ICMP_TTL {
            from {
                protocol icmp;
                icmp-type [ time-exceeded unreachable ];
            }
            then {
                policer limit-128k;
                accept;
            }
        }
        term REMOTE_ACCESS {            
            from {
                source-prefix-list {
                    SSH-PREFIX-LIST;
                }
                protocol tcp;
                port ssh;
            }
            then {
                count REMOTE_ACCESS;
                accept;
            }
        }
        term AAA_ALLOW {
            from {
                source-prefix-list {
                    TACACS-PREFIX-LIST;
                }
                protocol tcp;
            }
        }
        term SNMP_ALLOW {
            from {
                source-prefix-list {    
                    SNMP-PREFIX-LIST;
                }
                protocol udp;
                destination-port snmp;
            }
            then {
                count SNMP;
                accept;
            }
        }
        term NTP_ALLOW {
            from {
                source-prefix-list {
                    NTP-PREFIX-LIST;
                }
                protocol udp;
                port ntp;
            }
            then {
                policer limit-128k;
                count NTP;
                accept;
            }                           
        }
        term OSPF_ALLOW {
            from {

Prefix-sets

lab@vMX-1> show configuration policy-options 
prefix-list SSH-PREFIX-LIST {
    192.168.10.101/32;
    192.168.10.102/32;
}
prefix-list TACACS-PREFIX-LIST {
    192.168.10.200/32;
}
prefix-list SNMP-PREFIX-LIST {
    192.168.20.200/32;
}
prefix-list NTP-PREFIX-LIST {
    192.168.30.200/32;
}
prefix-list BGP-PREFIX-LIST {
    192.168.40.0/24;
}


                protocol ospf;
            }
            then {
                count OSPF;
                accept;
            }
        }
        term LDP_ALLOW {
            from {
                protocol [ tcp udp ];
                port 646;
            }
            then {
                count LDP;
                accept;
            }
        }
        term RSVP_ALLOW {
            from {
                protocol rsvp;          
            }
            then {
                count RSVP;
                accept;
            }
        }
        term PIM_ALLOW {
            from {
                protocol pim;
            }
            then {
                count PIM;
                accept;
            }
        }
        term IGMP_ALLOW {
            from {
                protocol igmp;
            }
            then {
                count IGMP;
                accept;
            }                           
        }
        term MSDP_ALLOW {
            from {
                protocol [ tcp udp ];
                port msdp;
            }
            then count MSDP;
        }
        term BGP_ALLOW {
            from {
                source-prefix-list {
                    BGP-PREFIX-LIST;
                }
                protocol tcp;
                port bgp;
            }
            then {
                count BGP;
                accept;
            }
        }
        term BFD_ALLOW {
            from {                      
                protocol udp;
                source-port 49152-65535;
                destination-port 3784;
            }
            then {
                count BFD;
                accept;
            }
        }
        term TRACEROUTE {
            from {
                protocol udp;
                destination-port 33434-33678;
            }
            then {
                policer limit-128k;
                count TRACEROUTE;
                accept;
            }
        }
        term REJECT_ALL {
            then {
                count REJECT_ALL;       
                discard;
            }
        }
    }
}
policer limit-128k {
    if-exceeding {
        bandwidth-limit 128k;
        burst-size-limit 15k;
    }
    then discard;
}

Apply in interface loopback

lab@vMX-1> show configuration interfaces lo0 
unit 0 {
    family inet {
        filter {
            input FIREWALL-RE;
        }
    }
}

Wednesday 17 June 2020

Hidden Command to support 3rd-Party Transceivers for Cisco

service unsupported-transceiver

Why considered hidden? Because you won't see it in the command.
Sample output:

RP/0/RSP1/CPU0:CORE1#ser?
service
RP/0/RSP1/CPU0:CORE1#service ?
  redundancy  Service Director related commands.

Applying:

Cisco IOS-XE
Router1(config)#service unsupported-transceiver
Warning: When Cisco determines that a fault or defect can be traced to
the use of third-party transceivers installed by a customer or reseller,
then, at Cisco's discretion, Cisco may withhold support under warranty or
a Cisco support program. In the course of providing support for a Cisco
networking product Cisco may require that the end user install Cisco
transceivers if Cisco determines that removing third-party parts will
assist Cisco in diagnosing the cause of a support issue.

Cisco IOS-XR
RP/0/RSP1/CPU0:CORE1#configure
RP/0/RSP1/CPU0:CORE1(config)#service unsupported-transceiver
RP/0/RSP1/CPU0:CORE1(config)#show configuration
Wed Jun 17 19:08:29.229 SST
Building configuration...
!! IOS XR Configuration 5.3.3
service unsupported-transceiver
end

Additional:
There's this command "transceiver permit pid all" applied under the interface.

RP/0/RSP1/CPU0:CORE1(config)#commit

RP/0/RSP1/CPU0:CORE1(config)#interface GigabitEthernet0/1/0/0
RP/0/RSP1/CPU0:CORE1(config-if)#transceiver permit ?
  pid  Permit pluggable pid (Product ID) all
RP/0/RSP1/CPU0:CORE1(config-if)#transceiver permit pid all


IP Service Level Agreements (SLA) , Embedded Event Manager (EEM) and Policy-Based Routing (PBR) in Cisco IOS


Objective: The PBR policy will be removed facing Uplink-Router once it detected that the server is unreachable.

Policy-based routing (PBR) is a method used to make routing decisions based on policies.


Scenario: Server1 providing web caching to customers for faster web page loading. Since there is route-map in place to route their http/https traffic to the next hop which is Server1, what if this server suddenly goes down?, the expected behaviour is  the customer won't be able to access websites.

Pre-setup:
1. Configure ACL for http/https 
Router1#
ip access-list extended  ACL-WEB
 permit tcp any any eq www
 permit tcp any any eq 443

2. Configure the route-map to match the ACL for http/https and set next-hop to the Server1 that provides the web caching services
Router1#
route-map ROUTE-MAP-PBR permit 10
 match ip address ACL-WEB
 set ip next-hop 192.168.1.11

3. Configure the IP and apply the PBR in this interface as it is facing the customers. (Assumption: L3 routing is configured between Router1 and Uplink-Router e.g. IGP or BGP)
Router1#
interface fa0/0
 description Connection to Uplink-Router
 ip address 172.20.10.2 255.255.255.252
 ip policy route-map ROUTE-MAP-PBR
 load-interval 30

4. Configure the SVI to become the Server's Gateway IP
Router1#
vlan 100
 name Server Farm Vlan

interface Vlan100
 description Server Gateway
 ip address 192.168.1.1 255.255.255.0
 ip verify unicast source reachable-via any
 load-interval 30

5. Configure L2 for interface facing Server-Switch
Router1#
interface fa1/0
 description Server-Switch
 switchport
 switchport access vlan 100
 switchport mode access
 load-interval 30
 spanning-tree portfast

Solution: Setup IP SLA to track the Server1 network reachability. If server is down, event manager will kicks in as it tracks the IP SLA (track 1)

A. Configure IP SLA:
Router1#
ip sla schedule 1 life forever start-time now
track 1 ip sla 1 reachability
ip sla 1
 icmp-echo 192.168.1.11 source-ip 192.168.1.1
 threshold 500
 timeout 500
 frequency 5

where:
 For IP SLAs operations, the following configuration guideline is recommended:
(frequency seconds ) > (timeout milliseconds ) > (threshold milliseconds )                                                            
B. Configure Event manager:
Router1#
 event manager session cli username "admin"
 event manager applet PBR-REMOVE
 description REMOVE PBR IN EVENT OF SERVER DOWN
 event track 1 state down
 trigger occurs 1
 action 1.0 cli command "enable"
 action 1.1 cli command "configure terminal"
 action 1.2 cli command "interface fa0/0"
 action 1.3 cli command "no ip policy route-map ROUTE-MAP-PBR"
 action 1.4 cli command "exit"
 action 1.5 syslog msg "Server Unreachable. PBR removed"

What does this do?
It is like a script:
login as username "admin" (local account) that is authorized to run all of the CLI commands. EEM does not require authentication, so need to add password. Execute the following:
configure terminal
interface fa0/0
no ip policy route-map ROUTE-MAP-PBR
exit

After this is done, it will send a log saying "Server Unreachable. PBR removed"

Any keyword will do, then can use to trigger NMS server to alerts once received that log
Enjoy!

Cisco IOS-XR vs Juniper Commands Cheat Sheet

Here's the Cisco IOS-XR commands vs Juniper OS commands
      CISCO IOS-XR              JUNIPER         
                                  BASIC                       
           show                                           show                    
          | include                | match
          ..formal |                                      display set             
           configure                    configure/edit
           shutdown                                        disable                
           no shutdown delete interface <interface> disable
            no                                           delete                   
           clear               clear
            show running-config                        show configuration         
            show version            show version
           show tech-support                    request support information       
    show configuration (after change)    show | compare (after change)
        clear counters <interface>          clear interface statistics <int>      
      clear line <line><line number>   request system logout <username>
            terminal length <num>                 set cli screen-length <num>     
            terminal width <num>       set cli screen-width <num>
                terminal monitor                     monitor start messages       
           terminal monitor disable          monitor stop messages
                  show clock                           show system uptime         
               show processes cpu          show system processes
                show logging                           show log messages          
                      ping                    ping
                  traceroute                                traceroute            
           show ip interface brief            show interface terse
                  show route                      show route forwarding-table     
              show route static        show route protocol static
               show route summary                     show route summary          
                show protocols            show route protocol
                show route ipv6                     show route table inet6.0      
            show interface be<xx>           show interface ae<xx>
        monitor interface <interface>            monitor interface <interface>    
                    reload            request system reboot
                   show users                          show system users          
          show diag / show inventory          show chassis hardware
                  show history                           show cli history         
                      dir             show system storage
                show enviroment                     show chassis environment      
              show memory summary        show chassis routing-engine
              show platform                           show chassis fpc            
          show controllers <interface> show interface diagnostic optics <int>
             show access-lists                          show firewall             
                          OSPF                    
               show osfp neighbor                      show ospf neighbor         
               show ospf database           show ospf database
               show ospf interface                     show ospf interface        
               show route ospf         show route protocol ospf 
                                         ISIS                     
             show clns neighbor                       show isis adjacency         
             show isis database             show isis database
                show isis route                         show isis route           
             show isis topology         show isis route topology  
             show isis interface                    show isis interface           
                                         BGP                      
                    show bgp                       show route protocol bgp        
                 show bgp summary             show bgp summary
               show bgp neighbors                  show bgp neighbors
           show bgp neighbor <ip> advshow route advertising-protocol bgp<ip>
      show bgp neighbor <ip>routes          show route received-protocol bgp <ip> 
        show bgp ipv6 unicast summary            show bgp summary
         show bgp all all summary                      show bgp summary 
    show bgp ipv6 unicast neigh <ip> advshow route advertising-protocol bgp<ip>
 show bgp ipv6 unicast neighbor <ip> routes  show route received-protocol bgp<ip> 
                show bgp regexp        show route aspath-regex
               show route bgp                       show route protocol bgp       
                                       MPLS                      
          show mpls ldp summary                         show ldp overview         
             show mpls interface             show mpls interface
        show mpls ldp neighbor brief                      show ldp neighbor       
              show rsvp interface              show rsvp interface
               show rsvp neighbors                       show rsvp neighbors      
                                  MULTICAST                    
              show mfib/mrib route                     show multicast route       
                show pim interface             show pim interface
                show pim neighbor                       show pim interface        
                show igmp interface             show igmp interface